My Blog has Moved!

Thanks for stopping by!  I’m excited to share that I’ve finally launched my new site at www.nwstamper.com!

I have already started posting new blog shares at the new site and am offering some Blog Candy for stopping by.  So please check it out.  All the blog candy details are here.

You can also find me on Facebook.  I’ll be using that page to keep you updated on specials, stamping news, share project samples, and would love to see your shares there too.  I’d love to have you as a fan. 🙂

Hope to see you on my new site – www.nwstamper.com soon!
Jennifer

An Owl Punch Flower Pendant Card

When I was visiting my mom last week, we got a chance to try out some different stamps and punches.  (One of the fun things of having an upline/downline – you can share stamps and products so you can try them out without having to buy everything yourself).  One of the items she had just received was the new Owl Punch.  This punch makes really cute cards – like this one that was shown at convention 2010.

But one of the other things you can do with it is make other neat punch art like bats and even a flower.  So, we decided to try out making a flower with the punch and once I had the flower, I then built a simple card to use it with.  We use the description found on the blog Flowerbug’s Inkspot to create the flower.  Her blog has a great description and photos but here is the quick version: 
Start by punching out 7 owls.  Take the main body of the owl from the punch and trim off the legs.  Then you fold the body in half so you have a centerline.  Fold the rounded bottom part of the owl in towards the center line so it looks kind of like a pie wedge.  Trim a curved lines starting from the point of the ears into the center line to make the white petals you see below.  Then glue the 7 pieces to a base piece of paper in a circle to make the flower.  I then added a vintage tag to the center and pierced two holes in the base cardstock to run the string through.  This allows the flower to swing like a pendant.

If you’ve found other fun ways to use this punch, I’d love to see them.  Leave a comment with a link to your blog or site with the sample and I’ll check it out!

Recipe:
Stamps:  Watercolor Trio
Ink:  Elegant Eggplant
Paper:  In Color DSP – Peach Parfait (Hostess), Crumb Cake CS, Very Vanilla CS
Accessories:  Owl Punch, Lg Scallop Circle Punch, Baja Breeze double stitched ribbon, vintage tag, Adhesive Pearls, Paper Piercer.

Technique night – Masking and Reverse Masking

Last night was my August technique night with my meetup group and we focused on masking and reverse masking.  For those of you not familiar with masking, this is the technique for using paper to cover (or mask) the area you don’t want to get inked.  So, in this first card we did, you stamp the colored cupcake on your paper and then stamp another copy of the cupcake on scratch paper.  Cut out the scrap cupcake and place over your original stamped image and then stamp your next cupcake, overlapping the scrap paper and your original image.  This gives the illusion of one cupcake being in front of the other without seeing the overlapping ink.   We also used the scrap cupcake to mask the frosting area when we stamped the candle so that you could choose the height of the candle and not have it overlap the top of the cupcake.

Next we did reverse masking.  This is where you cut out your scrap image and set your image aside and use the cut-out frame to let you add ink to the inside of the framed area.  In this case we sponged first and then while still keeping the frame in place, stamped our leaves images. This card was inspired by a card I found on the Stampin Up demo resource – Stampin Cconnection.  The origional was created by Allison Ohran

Finally we did one more card that combined both techniques.  We used reverse masking to make the sun and then placed the cut-out circle back on the sun and a scrap cutout of the treetop to mask the areas before sponging our sky.

Now, some tips:

Tip: When cutting out smaller shapes and circles, post-it notes work great for giving you something that can stick in place and then come up without leaving a mark.  For bigger shapes and frames, use a little bit of Dotto.  This adhesive lets you put your mask down and then pull it up an rub off any adhesive that gets left behind.

Tip: While I normally recommend stamping on Whisper White cardstock because it holds ink much better than standard white cardstock and computer paper, for the scrap image you are going to use for your mask, I would recommend in that case to use computer paper.  Because the paper is thinner, you tend to be able to get ink closer to the edge of your mask and so get a cleaner look.

Card Recipes:

Cupcake Card Recipe
Stamps:
Party Hearty
Ink:  Early Espresso, Crumb Cake
Paper:  In Color pattern pack – Hostess set, Daffodil Delight CS, Whisper White CS, Pacific Point CS
Accessories:  Peach Parfait marker, Daffodil Delight marker, Pacific Point marker, Early Espresso marker, Dotto

Thank You Card Recipe:
Stamps: 
Just Believe
Ink:  Wild Wasabi, Basic Black
Paper: Wild Wasabi CS, Basic Black CS, Whisper White CS
Accessories:  Dotto, Basic Black 1/4” grosgrain ribbon, snail adhesive, Stampin Dimensionals

Thinking of You Card Recipe:
Stamps: 
Bouquet Bunch, Teeny Tiny Wishes
Ink:  So Saffron, Old Olive, Bashful Blue, Soft Suede
Paper:  Bashful Blue CS, Soft Suede CS, Old Olive CS, Whisper White CS, So Saffron CS
Accessories:  Adhesive back pearls, Dotto, 1 1/4” circle punch

An altered notebook gift for my upline

One of the fun traditions of going to the Stampin’ Up convention is often uplines and downlines make little gifts for each other.  My way-upline, Julie Gunhus gave everyone personalized notepads and decorated pen.  My direct upline gave me a bag tag, some custom labels, and a cute box made using the new petal punch.  This is what I made to give to my upline:

I found some Spongebob spiral bound notebooks with hard covers in the dollar bin at Target.  I wish I had bought more because they were great for altering.  I picked cardstock that was similar in color to the covers since i was going the quick and easy route of only covering to the spiral binding.  I measured my cardstock to be about a 1/2″ longer on three sides so I could wrap the paper around the cover.  I used the Tombow liquid glue to coat the paper and then glued to the cover.  When folding the paper around to the inside of the cover, I folded the parallel sides over first and then finished by wrapping the side opposite the binding.  I then glued down a piece of white cardstock to the inside to finish off the inside.  Once the covers were wrapped, then I started stamping and embellishing.  I assembled the center image including the ribbon and then adheared the whole piece to my cover with sticky strip.  I waited until the cover was wrapped so I could make sure I had everything centered.  I then stamped the phrase “notes” so it was centered under the image.  I think that was the most stressful step because I was nervous it would get messed up but the stamps worked great and I love how it turned out!

I used the Rough Type Alpha and the Bouquet Bunch stamp sets for the covers.  These ended up being the perfect size for taking in our bag for convention and so I’ll be keeping my eye out to get more for future gifts.

If there is interest in more step by step instructions for making these, let me know and I’ll put something together.

Altered Notebook recipe:
Stamps: 
Rough Type Alphabet, Bouquet Bunch
Ink: Basic black, Old Olive
Paper:  Melon Mambo CS, Basic Black CS, Whisper White CS
Accessories:  Melon Mambo marker, Black Satin ribbon, Watercolor pen, Tombow liquid glue

More baby gifts – thank you card set and a frame

It seems like I know a lot of people having babies right now.  I reconnected with a friend recently on Facebook and learned she was due at the end of August with her first child.  I was so excited for her, I decided to make her a few things to send in addition to a gift card – what i call the light weight version of baby wipes. 🙂

First I created this photo layout for her using a 5×7 frame.  I started with the baby feet wheel and built the layout from there.  I found the DSP in my scrap pile and started layering pieces together.  After I had it assembled, I wanted to give the stamped image a little kick, so I inked up the wheel in Rose Red and wheeled out some more feet so I could cut them out and glue on top of part of the Chocolate Chip image.  Finally, I added one of the Sherbet designer buttons from last catalog.

Then I created a set of simple thank you notes so she has something fun Io send folks who give her little girl baby gifts.  I love the Fox and Friends stamp set for baby stuff and so had to use a variety of critters from the set for these cards.

I also stamped the envelopes to match the cards.  It was a good reminder about how the quality of paper you stamp on affects your image.  I was out of Stampin’ Up! envelopes so I used some of the value pack envelopes that I got from Michaels a while back.  Definitely doesn’t grab the ink nearly as well as Whisper White paper, but it works ok.

Baby Thank You Cards recipe:
Stamps: 
Fox and Friends, Thank You Kindly
Ink: Chocolate Chip
Paper:  Whisper White CS, Melon Mambo CS
Accessories:  Stampin’ Write Markers, Delicate Dots embossing folder, 1 3/8” circle punch, Scallop Circle punch

Baby brag book and photo frame

My friend Sue was so excited to share the news of her new baby granddaughter born a couple weeks ago.  This is her second grandbaby and it was her daughter who gave birth and everytime I talked with her you could hear the excitement and pride in her voice.  So, I had to make her a couple gifts to have some personalized spaces to show off her family.

First was a brag book to carry in her purse.  I bought one of those slim photo books from Target and pulled out the boring papers that served as the front and back covers.  I then created new custom inserts using mostly paper and embellishments that would be slim (so the inserts would actually fit in the plastic sleeves for the front/back covers.  i used the Rough Type Alphabet (so sad it is retiring at the end of the month!) to create the front label and layered that on some punched cardstock and then Pink Pirouette that had been texturized using the Square Lattice folder in the big shot.  The back cover I added some pearls to the Butterfly to add a bit of bling wthout making the page too thick.  Finally, I used sticky strip to add some ribbon to the spine to add a simple finishing touch that wouldn’t get ripped off if she tossed this into her purse.

I have to say, the trick for picking up the adhesive back pearls using your paper piercer works super well!  It makes it really easy if you use the pointy tip of your piercer to get under the glue on the page and then the pearl sticks to the point until you place it down on your image.

The second thing I made her was a magnetized photo frame.  This used a photo mat that had been pulled out of a Costco photo frame.  i then added DSP and embellishments to the frame to personalize it.  I then cut some thin chipboard and used sticky strip on three sides of the chipboard to adhere it to the back of the frame.  Finally, I cut some magnet pieces (I am so excited about the new magnet sheets for the BigShot, i may have to make some more projects in the future with this!) and glued the magnets to the back of the frame and it is ready for a photo and to be placed on the fridge.

Brag Book Recipe:
Stamps:  Rough Type Alphabet, Occasional Quotes
Ink;  Rose Red, Chocolate Chip
Paper;  Basic Black CS, Rose Red CS, Pink Pirouette CS, Whisper White CS, Lavender Lace CS
Accessories:  Scallop Edge Trim punch, small heart punch, rose red marker, chocolate chip marker, two way glue pen, Dazzling Diamonds glitter, Crystal Effects, Grey Satin ribbon, 1 3/4” circle punch, Extra large scallop circle punch, lattice die, rose red 1/4” ribbon

Training the trainer – an introduction to stamping

Last week, I had the fun of introducing a friend to awesome world of stamping and paper crafting.  Nikki is my personal trainer from the gym (gotta kick out those last few pounds of baby weight!) and she has been very curious to check out Stampin’ Up!.  Since she wouldn’t be able to get a workshop scheduled until September and she was going back to Hawaii to celebrate her Grandpa’s 100th birthday in a few weeks, I invited her over to create a card and gift for her Grandfather.  We had a blast playing with everything and helping her create something that she loved and was going to be special for her Grandfather.

So, we created a card and then an 8×10 photo page.  She attached a photo of her Grandpa and Grandma and we left the space under the photo blank so she could hand write a message to him.   Aren’t they the cutest couple?? 🙂


I loved helping her try everything out and create something special and she can’t wait to take it to show off to her family. 😉 

Birthday Photo Layout Recipe:
Stamps:  Whimsical Words (Sale-a-bration 2010 set)
Inks:  Night of Navy
Paper:  Whisper White CS, Night of Navy CS, Bashful Blue CS, Pink Flamingo DSP
Accessories:  So Saffron 5/8″ ribbon, Corner Rounder punch
Paper:

My new Facebook page – SU display boards and a Fan Special deal

While I work on writing up blog posts for some projects I’ve done recently, I wanted to share my recent labor of love – a new Facebook page.  I’ve set up a page on facebook at a place to share pictures, promotions, and make it easy for others to share their projects as well.  I’d love for you to check it out.  Right now it has a couple photos posted that will be making their way onto the blog soon but you can get an early look by visiting my Facebook page.   I’ve also posted photos of more convention display boards on the page as well.

While you are there, become a fan to be eligible for special deals and get samples and information as it comes out.  Once I have 25 fans, I can make the web address for this page much easier to find; so I’d love it if you were willing to be my fan. 

Visit me on Facebook!

Facebook Fan Special

To thank folks for helping me get to 25+ fans, I’m offering a special from now until 8/19.  I’m offering this special to anyone who has become a fan of my facebook page.  Simply place an order of $25 or more and receive the new Antique Brads FREE!  That’s a $5.95 value for free just for becoming a fan.  For example, love the vintage look – try the new Crochet Trim ribbon and the Distressing Kit and get Antique Brads FREE!  Thats a $33 value for $27.  Email me to take advantage of this special offer!

Crochet Trim

Distressing Essentials Kit

Free Antique Brads


See a sample using some of these items in this post –  https://stampingplace.wordpress.com/2010/08/06/stampin-up-convention-2010-punch-happy-swaps/

Punch Art Flower for my August Meetup

Yesterday was the August meet and greet for my Meetup group here in the Bay Area.  A few of us got together and had some pie at Marie Callender’s and I brought a free make and take for everyone to do.  This month I decided to do some punch art and so I modified a past card I had made to use some new stamps and colors and came up with this card.

This was an easy card that used 7 punches in all, though you could modify this card to use fewer punches or more stamps.  Here are the steps to create it yourself:

  1. Punch the base of the flower using the extra large Fancy Flower punch
  2. Stamp the five petal flower image from Punched Posies hostess set, once on colored cardstock and once on white cardstock
  3. Punch out stamped images using the Five Petal punch
  4. Stamp the smaller six petal flower image from the Punched Posies hostess set on white cardstock and punch out the center using 1/2” Circle punch
  5. Layer these punched images together and glue
  6. Punch the leaf using the Small Oval punch
  7. Fold the oval in half and trim one side to form a point
  8. Stamp the vase using one of the ornament images from the Delightful Decorations stamp set on white cardstock
  9. Punch out using the ornament punch and trim the bottom of the ornament to form the flat base of the vase
  10. Stamp the sentiment from the Because I Care hostess set on white cardstock
  11. Punch out sentiment using the Large Oval punch
  12. Punch corners of base white cardstock with the Ticket Corner punch
  13. Stamp the stem using the stem image from the Punched Posies stamp set on base white cardstock
  14. Glue down onto your card base and your done!

Punched Flower Recipe:
Stamps: Punched Posies, Delightful Decorations, Because I Care
Ink: Poppy Parade, Daffodil Delight, Old Olive
Paper:  Old Olive CS, Whisper White CS, Poppy Parade CS, Daffodil Delight CS
Accessories:  Fancy Flower punch, Five Petal punch, 1/2” circle punch, Ornament punch, Ticket Corner punch, Small Oval punch, Large Oval punch

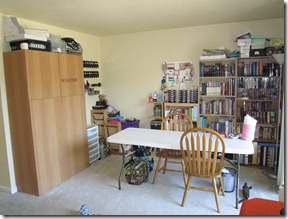
Organizing my craft room

Between the big color renovation, the old catalog retirement, and getting ready for convention, my craft area had become a disaster zone.  You know the feeling… table buried under paper scraps, adhesive backing, ribbon, stamps, half completed projects. 

IMG_1103Well, I decided it was time to dig out and get organized so I can start using all the cute and fun new stuff that I’ve gotten recently.  Now I’ve gotten everything put away and it is definitely more motivating to craft. 

If you have any tips or tricks for organizing, I’d love to hear about them.  Please leave a comment and/or a link to a photo of your creative organizational techniques.

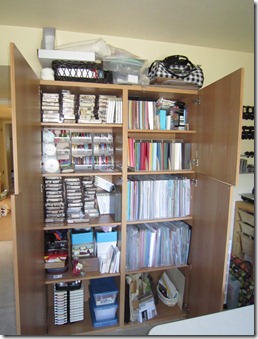
For me, I love this bookshelf I got at IKEA.  It is very strong, which I need for all the paper I’ve accumulated. Smile I have a shelf for retired stamps, ribbon, current stamps, cardstock, 12×12 paper, ink, wheels, and misc other stuff.  Plus the doors keep it out of the sun and away from little baby fingers. 

Tip:  Turn you paper holders (the mazagine file style) on their backs so what is normally the top is pointed to the front.  This makes it really easy to see what paper you have and you can grab and go without pulling out the whole container.

IMG_1102

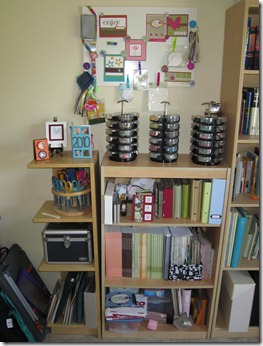
I also have a smaller bookcase where I store my catalogs, magazines, small albums and my stack and store spinners.  Let me tell you, I LOVE these spinners and for some reason it just makes me so happy and ready to embellish when I see them sitting out in a row.

Tip:  Use a magnetic board to put up cards or projects that inspire you.  Hang embellishments that you want to use but don’t have an easy storage space with magnetic clips so that they are in front of you (so you remember to use them) and easy to grab and then put away.  You can also get magnetic spice containers with clear lids to store small items like die cuts, brads, or gems.IMG_1106

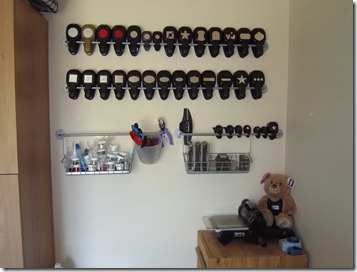
Finally, I have my punch storage.  These rods work perfectly for the old style of punches and I recently found that the hanging wire baskets that you can get to go with them are just the right size for the new slim style of punches.  It’s the perfect system for a punch junkie like me.IMG_1107So that is my craft space.  Hopefully you saw some new idea or at least a reminder for one of your own projects.  I’d love to hear your thoughts on what organization solution you like or if you have some new ideas for me!  Until next time, I’m off to make a mess again!